Looking back at the pictures, I’m realizing now that the vineyard planting we did this year (2025) was a long time in the making. While I mentioned the vineyard in my Getting ready for spring blog post earlier this year, I haven’t yet written about the actual process of planting the whole vineyard. Needless to say – the planting was a lot more work than we had thought it might be – but also totally worth it!
The first time we drove down the farm driveway, Laura and I both agreed that the hill along the driveway facing south, and overlooking the lake, would be a beautiful place for a vineyard. The space isn’t massive – just a hair over 1/2 an acre by my estimates, but it was perfect. There was actually already a partial row of grapevines that the previous owner had planted but we dreamed of filling the whole hill with vines. Our initial thinking was that the rows should be laid out with a trajectory being primarily straight across. However, the more we looked at different layouts, and the more we visited other vineyards, we decided on a more unique plan. We took into consideration the slope and gradient of the terrain and came up with this layout for the hill…
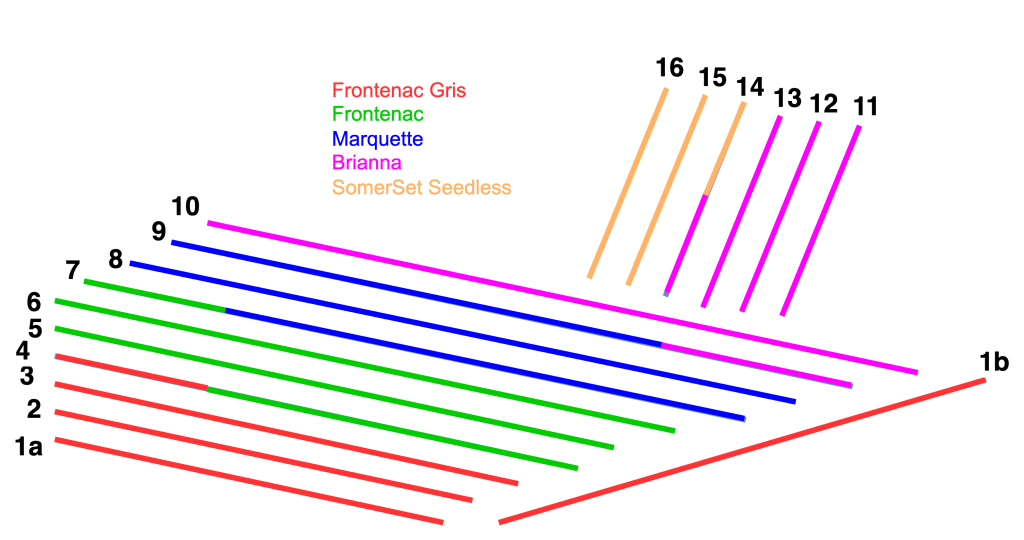
Rows 1a and 1b were our first plantings, a sort of test run. We started by ordering 25 vines of Frontenac Gris and planted them at the bottom of on the hill in late May 2023. This was mostly a means for us to experiment with different trellis techniques and ensure the vines would take with the soil and planting method we were using. The planting of this first row was pretty straightforward. We had previously mowed down the tall grass on the hill where row 1 would be and laid out the trellis lines. Once we picked up the grapevines we simply measured 6 foot spacing along the line and dug a hole about a foot and a half deep for each vine. Our good friend Matt came up to help with the planting.


While the vines were young we didn’t need to install a trellis yet – rather we just added a grow pole to each of the holes for the vines to climb up as a means of reaching the top trellis wire when it was eventually installed. That said – I had started researching the various ways to trellis and had settled on using 8 foot long wooden poles spaced out every 4 vines. The vines were arranged 6 feet apart, meaning we’d have 24 feet between support poles along the line. While we likely could have gone a bit further, having more poles along the line also helped us deal with the hill’s curves on the longer spans of trellis. I also started researching all of the tools needed for this kind of work from crimpers, spinning Jennys, wire strainers, springs, Gripples and more. We also invested in a power auger for drilling holes for the poles as well as the vines.
Unfortunately, we soon learned that the deer really enjoyed snacking on the young vines. We came to the farm one weekend mid summer 2023 to find that the deer had eaten off the tops of most of our initial vines. We did what we could to fence in the row but at that point the damage had already been done. We waited anxiously to see what those vines would do come 2024 and to our surprise they all recovered incredibly well. We invested in an electric fence to encircle row 1 and then began planning the expansion of the vineyard, the entire hill.
The first step to prepare for more planting was to mow down the grass on the hill. This was done in phases. We have an old PTO mounted brush cutter that I used for the bulk of the initial mowing. The dried grass was raked up to use for mulch in our gardens. I was then able to use our regular lawn mower to keep the grass at a manageable height.


I completed this prep-work at the end of 2024 and we decided to tackle the overall row layout at the same time. To do this we measured the spacing for each row’s end poles and placed them. With this done, the last act of 2024 was placing our vine order. Based on the row layout we were able to determine that the vineyard could accommodate 333 vines spaced 6 feet apart. With the 25 we had planted previously this brought our order to 208 vines for 2025.
Fast forward to 2025, we were anxiously waiting to start planting. I had spent the winter finalizing the parts we needed for planting, trellising, and watering. After the inefficiency of manually watering the 25 vines that we had initially planted, we decided to install irrigation for the vineyard. Young vines require a fair amount of water and the last two years in northern Wisconsin were fairly dry. Automating this part of the process would be worth our time and energy. We had an unseasonably warm spring with temperatures reaching almost 90 degrees in early May. We picked up the vines from the nursery around that time and started tackling the planting shortly thereafter…


At this point, we only had the trellis end posts installed. We decided it would be best to get the vines in the ground as soon as possible and focus on the trellis work after. The trellis really isn’t needed in the first year since we are training the vines to first climb the grow poles installed with each vine. Part of our plan, however, was for the trellis to also support a lower wire to run the irrigation line along, so I was in a hurry to get the trellis installed so we could efficiently water each vine after planting. Before we could start planting, we had to lay out the rows. The end posts served as the guides for us, but in some of the longer rows you couldn’t see one end post from the other as the hill peaked at the middle. We tried a lot of layout methods but, since the hill was so high in the middle, even using a string was hard to do. I finally came up with a solution using a laser where I aimed a laser from a post at one end post to the other. Once I had this line in the air we measured 24 feet from the end post and waved the post in the air until the laser showed up on the post. Then we leveled it and marked the ground with marking paint. The process was tedious but worked.
Once we had all of the posts marked we went back and marked where each vine should be planted between the posts. Then came augering for each vine and post. This took a very, very, very long time. We started rows with me augering and Laura following with planting the vines. It was back-breaking work. Each time the auger would catch a rock or a root the whole auger would stop torquing the handles against your grip. I was more then relieved to get the augering work done – and the planting went pretty quickly after that – but this was only about half of the work. We still had to install the trellis posts, run the trellis wire, run the irrigation line, install the valves and grow tubes, extend the electric fence, and make sure everything worked. I ended up renting a trencher for the irrigation work and it was a true life saver…


Once the line was trenched I had to install all of the valves for each row and run the wiring for each valve to a central controller. We opted for 1 gph emitters on each vine aiming for a slower longer watering hoping that would help the water absorb more. Once that was run, I still had to install two trellis wires on each row which involved crimping them and tensioning them with wire strainers on the end posts. But before you could do that we had to attach the end posts into anchors in the ground. We had done this initially by screwing in the anchors by hand with a long bar. It was a pain in the rear end and extremely time consuming. I had mentioned the problem to my brother and he offered to design a driver for the augers to be mounted on an impact wrench…


The outcome was a true life saver – with this attachment I could drive an anchor in a matter of seconds. Without a doubt, this was one of the best optimizations for the second planting outside of buying the auger for the holes themselves. I posted a video of us using it on our Instagram page if you want to see it in action.
We completed the bulk of the work by the end of May but still had some lingering items to wrap up. After our first run-in with deer we opted to extend the electric fence around the entire vineyard which was fairly easy to do. I had done a lot of reading about grow tubes for additional protection and was initially hesitant about using them. I wasn’t sure of the cost and added work to install would be worth it. After talking to some other vineyards though, I learned it was pretty common to use shortened versions of the tubes to prevent animal damage in the first couple of years. We decided to move forward with installing grow tubes around each vine to protect them from smaller animals around the property, like rabbits, from chewing the young vines off at the ground.


At this point, though we were largely done with the grunt work, vineyard maintenance took up the rest of the summer. Watering was a breeze with the automatic irrigation, though we didn’t need to use it much that first year with the fair amount of rain we got in 2025. The biggest challenge we found was mowing and keeping the grass/weeds down. We were very intentional about spacing the rows so we could easily mow but what I didn’t account for was the amount of time and effort required to weed whack around each individual vine. It was a lot of work and took up a lot of our time. We’re still sorting out how we can optimize this going forward.
That said, the vines all did really well. Some even reached the top trellis wire in their first year! I’m excited to see them come back to life this coming spring. Stay tuned for more vineyard updates in 2026!


0 Comments